SincpacC3D
General Information
Command Summary

LotCorners
|
SincpacC3D
General Information
Command Summary
LotCorners |
Description
The LotCorners command sets points on all lot corners in the selected parcel(s).
Usage
Type LotCorners at the command line. You will see a dialog box similar to the one below, containing a list of all sites in the current drawing:
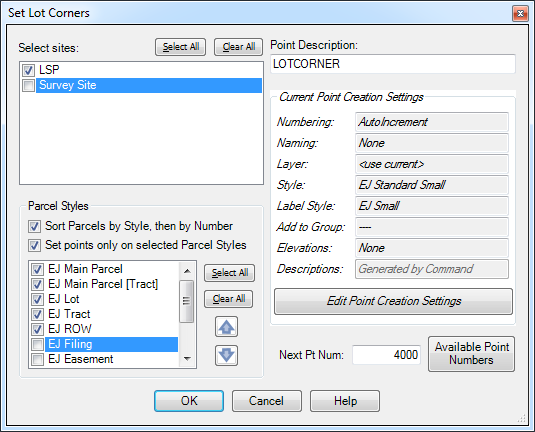
Select the sites on which you wish to set lot corners from the list. By default, points are placed on parcels in numerical order. However, if you select the option to "Sort Parcels by Style, then by Number", the parcels are sorted first by Style, then by Number. To change the order of Parcel Styles, select a Parcel Style and click on the arrows to move it up or down in the list.
If you select the option to "Set point only on selected Parcel Styles", points will only be set if the parcel's style is selected in the list. In order to select or deselect an item in the list, you must first click on the item to select it, then you can click on the item again to change the checkbox. This control is setup this way because you may also click on an item and then use the arrows to move it up and down in the list.
The right side of the dialog box contains the Point Creation Control, which summarizes the current Point Creation Settings. You may adjust these settings by clicking the "Edit Point Creation Settings" button, which will take you to the Point Creation Dialog. Note that the Description settings are not available for this command, since the generated Cogo Points use the Point Description specified in the main dialog box.
Note that the Point Creation Settings let you select various options for Elevation. When you select PickPoint, the Cogo Point elevations are taken from the Parcel lines (this option does not work on C3D 2010 and earlier). All of the other options should work as-expected, except at this time, if you select "Manual" elevations, there is no indication of which point is being generated, so you'll have no idea which elevation to type. This issue should be addressed in a future release. In this release, the "Manual" option is probably not very useful.
Examples
In the example below, points were set at all lot corners.
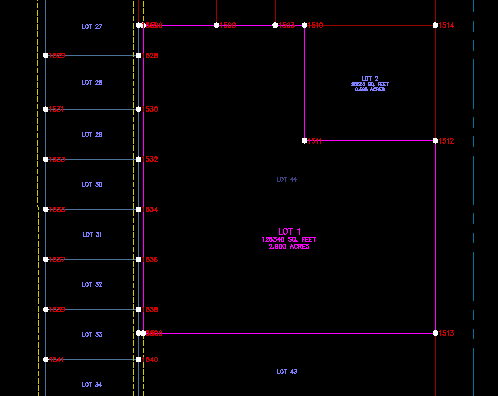
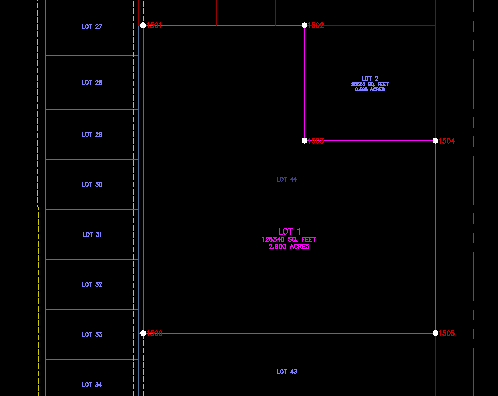
In the example below, the "Main Parcel" style was selected in the list, and points were set only on the parcel with this style. Note that only the corners of this parcel were set, so there are only two corners set on the northern-most line of the property. Compare that to the last example, where corners were also set on all the adjacent lots, and the north property line had two additional corners set where it abutted the lot lines for the property to the north.
See Also
Create Points at the exact location and elevation of Surface Elevation Labels.
Find and Replace text in the Raw Description of Points.
Displays a list of available point numbers in the command window.
Create hash marks at PIs, PCs, PCCs, and PRCs along polylines, Feature Lines, Survey Figures, or Parcels.
Create hash marks at PIs, PCs, PCCs, and PRCs for all Parcels in the selected Sites.
Select a point and see a list of all point groups it belongs too. Also allows you to remove the point from selected groups.
Creates offsets with varied distances around parcels. Useful for setbacks and utility easements that run at differing distances around the lot, such as 7' along the front, 5' along the sides, and 10' along the rear.
Generate Cogo Points along an entity, using prorated distances.
Finds the daylight point on a surface from a selected point, using the point or user entered elevation.
Create elevated offset points along Feature Lines, Survey Figures, Parcels, Polylines, or 3D-Polylines for survey stakeout.
Displays a list of used point numbers in the command window.
Zoom to a Cogo Point by typing the Point Name or Number in the command window.
