SincpacC3D
General Information
Command Summary

PerpCheck
|
SincpacC3D
General Information
Command Summary
PerpCheck |
Description
The PerpCheck command analyzes all Parcels in the selected Sites, marking the points where the lot lines form perpendicular or radial intersections. The command can also mark corners where lot lines are NOT perpendicular or radial. The routine also attempts to detect errors in the Parcel linework, and will mark places that appear to be errors. There are some errors that it can't detect, but it will mark the ones it can find.
The PerpCheck command places blocks at the indicated points. A block named ZZZZ_MARK_PERP is used for points where lot lines form perpendicular or radial intersections, and a block named ZZZZ_MARK_NONPERP is used for the intersections that are not either perpendicular or radial, but are still within the specified tolerance angle of being perpendicular or radial. If the routine detects something that appears to be an error, it will mark the spot with the ZZZZ_MARK_ERROR block. The blocks are placed on a layer named _PerpCheck_MARK, which is automatically created if it doesn't exist.
You may create the ZZZZ_MARK_PERP, ZZZZ_MARK_NONPERP, and ZZZZ_MARK_ERROR blocks yourself if you wish, and keep them in your drawing template; if they exist, the routine will use the existing blocks. However, this is optional. If any of the blocks do not exist in the current drawing, the PerpCheck command will automatically create them. The default blocks are a green square for the ZZZZ_MARK_PERP block, a magenta circle for the ZZZZ_MARK_NONPERP block, and a red 'X' for the ZZZZ_MARK_ERROR block. These blocks may be either normal or Annotative blocks. If they are normal blocks, they are scaled by the current modelspace Annotation scale as they are inserted; if they are Annotative blocks, they are assigned the current modelspace Annotation scale as they are inserted.
After running the PerpCheck command, you may use the PerpClean command to clean up the drawing. The PerpClean command will erase all marker blocks.
Usage
Type PerpCheck at the command line. You will then see the following dialog box:
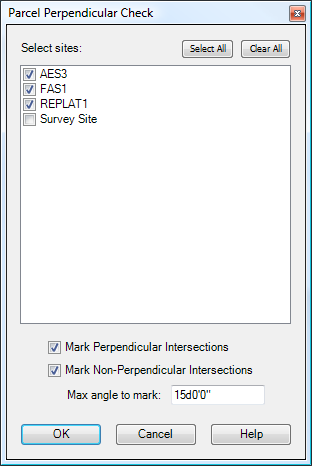
Select Sites:
Select the Sites you wish to analyze.
Mark Perpendicular Intersection:
Check this box if you want the routine to mark all intersections where either perpendicular or radial lot lines meet.
Mark Non-perpendicular Intersections:
Check this box if you want the routine to mark all intersections that are not either perpendicular or radial.
Max angle to mark:
This option is only enabled if "Mark Non-perpendicular Intersections" is selected. This value specifies a tolerance range for the angle. Nonperpendicular and nonradial intersections are only marked if they are within this range of being perpendicular or radial. For example, if this value is set to 10�, a lot corner that forms an angle of 82� would be marked, as would one of 99�, but angles of 77� or 101� would not be marked.
Examples
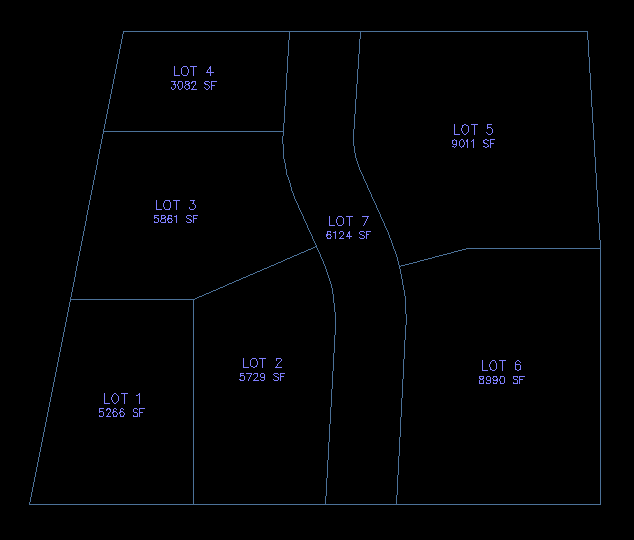
Example 1:
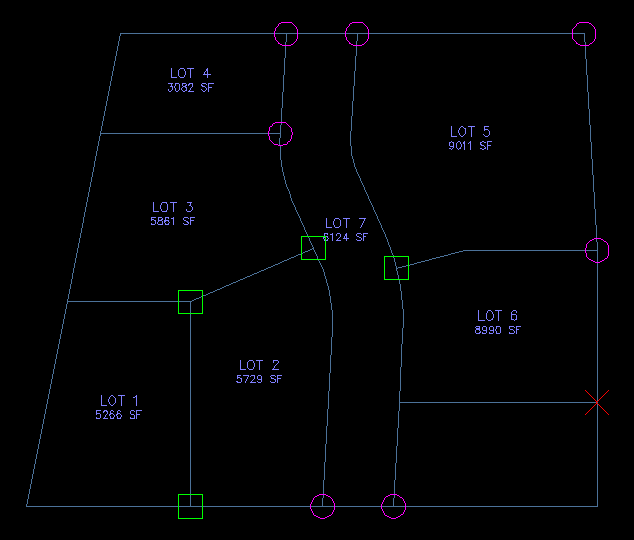
Imagine we have the following set of parcels.
The following image shows the results if we run the PerpCheck command with the settings specified in the image shown above - i.e., both Perpendicular and Nonperpendicular markers are selected, and the tolerance angle is set to 10�:
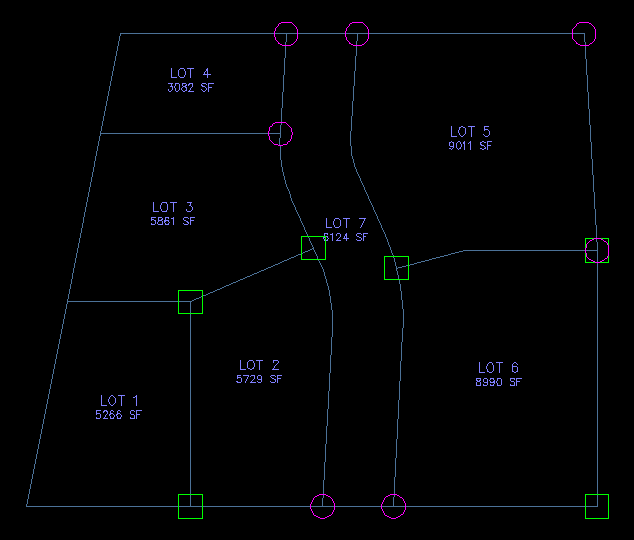
All intersections that are perpendicular - i.e., form an angle of 90� - are marked with a green square. Similarly, lot lines that hit perpendicular to curves, such as the northwest corner of Lot 6, are also marked with a green square.
Intersections where the lot lines are not perpendicular or radial are marked with red circles. However, intersections are not marked if the intersection is more than 10� from being perpendicular or radial, such as along the western edge of the Parcels. Similarly, the angle point in the line between Lot 5 and Lot 6 is not marked, because it is more than 10� from being a right angle.
Some intersections may be marked as both. For example, the northwest corner of Lot 6 forms a right angle, but the southwest corner of Lot 5 forms an angle that is less than 90�. So that corner is marked with both a green square and a red circle.
Example 2:
The PerpCheck command will also display a warning in the command line if it finds any improper linework. For example, consider the set of Parcels shown below:
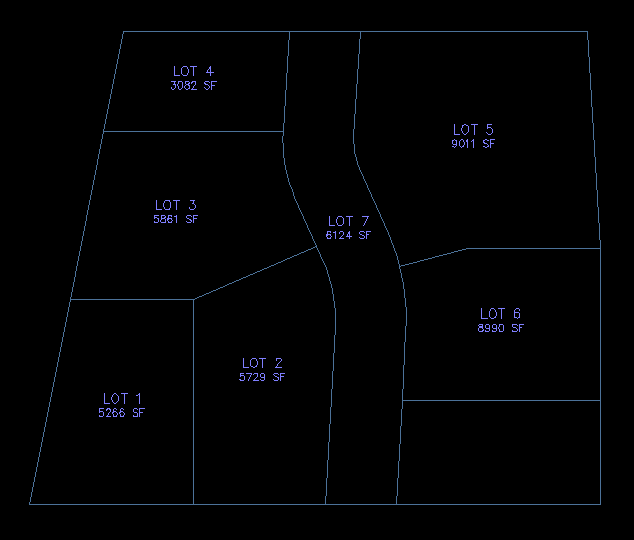
There should be three Lots along the east edge of the Parcels, but the line in Lot 6 does not quite go all the way across. Therefore, there is only one lot in the southeast corner, where there should be two. There is also a "bogus" parcel line. This parcel line will cause the PerpCheck routine to fail when it attempts to analyze Lot 6. The PerpCheck command will display a warning message in the command line that looks like this:
WARNING: Could not check Parcel 6 - parcel linework may have an error.
When an error occurs in a Parcel, the PerpCheck command does not check the parcel for perpendicular intersections. However, it will attempt to mark the spot where the error occurs, as shown in the drawing below. Note, however, that Lot 6 was not checked for Perpendicular or Nonperpendicular intersections. There are some Markers around Lot 6, but those were created as the PerpCheck command analyzed the adjoining Parcels.
See Also
Create hash marks at PIs, PCs, PCCs, and PRCs for all Parcels in the selected Sites.
Creates offsets with varied distances around parcels. Useful for setbacks and utility easements that run at differing distances around the lot, such as 7' along the front, 5' along the sides, and 10' along the rear.
Cleans up all marker blocks created by the PerpCheck command.
