SincpacC3D
General Information
Command Summary

Parking
|
SincpacC3D
General Information
Command Summary
Parking |
Description
The Parking command may be used to create parking stall linework. Parking stalls may be created by specifying stall dimensions, or by creating a specified number of equally-sized parking stalls between the selected points. Includes ability to automatically label the parking stalls with a stall count as they are created.
Usage
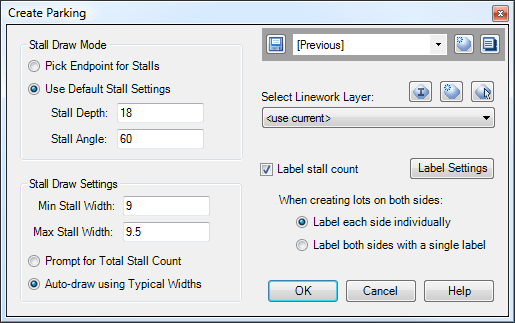
Type Parking at the command line, and a prompt similar to the one below should appear:

In response to the prompts, pick points on-screen or key in point numbers to draw parking stalls. Type "S" to call up the Settings dialog, seen below:
Quickset Panel
In the upper-right corner is the Quickset panel, which may be used to save and recall your favorite settings.
Stall Draw Mode
There are two possible draw modes for stalls. In both modes, the process begins by selecting two points to draw the back of the stalls. Then, if "Pick Endpoint for Stalls" is selected, the next point should be the endpoint of a stall on one end of the group of stalls. This method is designed to be used with survey data, to draw parking lots tied down in the field. Alternatively, the "Use Default Stall Settings" option may be selected, to draw stalls using the specified dimensions.
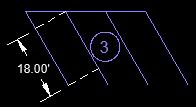
When using the Default Stall Settings and creating stalls at an angle, the Stall Depth is measured along the portion of the stall that has paint stripes on both sides of the parking space. The following image illustrates some stalls with a Stall Depth of 18.00 feet and a Stall Angle of 60 degrees:
Stall Draw Settings
The Stall Draw Settings control the auto-calculation of the stall widths. There are two possible modes of operation.
When "Prompt for Total Stall Count" is selected, you are prompted to enter the total number of parking spaces. The back line is then divided evenly, to create the specified number of parking spaces. The suggested value is determined from the "Min Stall Width", and specifies the greatest number of parking spaces that will fit, and still be larger than the minimum stall width.
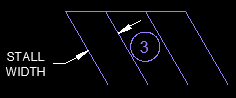
When "Auto-draw using Typical Widths" is specified, stalls are automatically drawn, using the specified Min and Max Stall Widths. The routine will create as many stalls as possible, holding the specified parameters. If necessary, padding will be left at the end of the stalls, to keep the individual stalls from exceeding the maximum stall width.
The stall width is measured perpendicular to the paint stripes, as shown below:
Select Linework Layer
This is the layer that the stall linework will be drawn on. Click on the small buttons to create a new layer, or to select a layer by picking an item in the drawing.
Label Stall Count
When this item is selected, you will be prompted to place Stall Count labels in the drawing after each set of parking stalls is created. Press the Label Settings button to call up Parking Count dialog box, which may be used to adjust the current settings, as well as see a total count of all parking spaces in the drawing. (The Parking Count is determined by adding up the current values in all the COUNT attributes of the label blocks currently in the drawing.)
See Also
Creates offsets with varied distances around parcels. Useful for setbacks and utility easements that run at differing distances around the lot, such as 7' along the front, 5' along the sides, and 10' along the rear.
Display the total count of parking spaces in the drawing.
